homemade thai iced tea

Homemade Thai Tea

it was a much anticipated week —
one that would bring
joy & laughter,
likely some self examination
(indeed, much reflection)
along with ample weather indecision:
storms & sunshine abound!
for 7 days dw & i hosted
our nephews,
jewel of boys,
long limbed and boisterous,
sweetly affectionate (still.)
(ps. please always be affectionate.)
infinitely curious
boundlessly active.
and so to add to all that frenzied energy
i made thai iced tea
because you know,
adding caffeine + sugar to all that
seemed like a good idea.
plus, it’s one of Q’s fave beverages.

thai iced tea

thai iced tea
serves 2-3

note: i am not a tea connoisseur, so i emailed a new fave blogger, Bonnie of Thirsty For Tea for some tips. bless her heart, she was so patient with my incessant questions. under her tutelage i bought the tea from teavana, because the three regular cafes and supermarkets i went to didn’t have what i was looking for. also, don’t be alarmed that the finished product doesn’t have a neon orange hue to it. i did all the freaking out for you. i was worried that i messed the recipe somehow. apparently, thai restaurants and cafes/shops that serve thai iced tea use a mix or add the color artificially. i didn’t know, now i do, and so do you. you’re welcome.

4 cups water
4-6 tsp thai black tea
3-4 tsp simple syrup (just water + sugar, i keep this on hand always in the fridge)

i brewed the tea in my coffee press. bring water to a boil. meanwhile, measure out the desired amount of tea. the package says 1-1.5 tsp for every 8oz/1 cup. i didn’t want too strong of a drink, as Q is only 12 and i’m not sure about giving kids too much caffeine or whatever.

pour boiled water into press carefully. allow to steep for 2-3 minutes. i may have let it go for 5 minutes, i was busy making dinner. carefully press down the plunger. pour the tea into a carafe or in my case, a jar. allow to cool. refrigerate.

to serve, fill a glass with ice. pour tea about 2/3 of way. sweeten with simple syrup to taste, top with half/half or non-dairy milk.

BAM!

Homemade Thai Tea

pickled beets + urban picnic

Pickled Beets

i’ve been into quick pickling
this summer,
mainly because we have a glut
of vegs,
also because
it’s good for digestion,
and because
we have a lot of jars,
either i chuck ’em or use ’em.

when i’m in a mood
and food is the last thing
i want to play with,
we have picnics,
stuffed heaped on bread,
though not as fancy as this,
still very satisfying.

what’s your fave pickled veg?
(and, can you send me some?)

pickled beets + urban picnic

pickled beets

*note: this is the kind of recipe that is going to require you to use some common sense. beets vary in size, you might like your beets more tender, or more al dente. this is just a guideline.

12 small – medium beets, scrubbed and peeled
drizzle of oil (olive oil, i used organic canola oil)
dry italian seasoning (though fresh rosemary or thyme would be nice)
2/3 cup sugar
1/2 teaspoon salt
1 cup vinegar
1/4 tsp black peppercorns
6 whole cloves
6 whole allspice berries
2 -3 wide strips lemon zest
3 – 5 star anise
2 cinnamon sticks

heat oven to 400F.

meanwhile, with netflix going (i was watching Arrow, i think i’m gonna hit up The Returned next), scrub beets and peel. (i have a love hate relationship with this step. you can roast them first and then it’s easier to peel the skin away while warm, but i find that messy, with oil and random bits of herbs sticking to your hands. it’s up to you.) cut up any large beets so they’re all approximately the same size. place beets on baking dish lined with large piece of foil. drizzle with oil, top with italian seasoning, salt/pepper. cover with another sheet of foil and roast for 45min – 1 hour, until beets have reached desired doneness. this time around i made them tender, but the batch before that were toothier. do what you like.

when beets are warm to the touch, slice them up in either 3/8″ rounds or wedges. (i’ve done it where i sliced the beets before roasting, which made for much quicker roasting time, again, up to you.)

meanwhile, stir sugar, salt + 2 cups in sauce pan. bring to a gentle boil and stir until sugar dissolves. take off heat, stir in the vinegar and remaining seasonings. allow to cool.

in clean mason jars (or in our case, our huge 1/2 gallon mason jar) put the beets in a layer formation. (note: you can also add in sliced onions or cucumbers). half way up, pour a bit of the brine in, along with the various seasonings. continue to layer up with remaining beets and pour the rest of the brine into jar. if there is any leftover space in the jar, add a bit more water & vinegar (1:1 ratio) to top.

refrigerate for a day or so and consume. they do last awhile, just remember to use clean utensils when extracting the beets from the jar to keep from contamination etc.

BAM!

also pictured:
dutch oven bread
bruised cucumber salad

blueberry clafoutis

Blueberry Clafoutis

i’ve talked about it before
living in the city
has its perks
the vibrancy
the nearness of things
the anonymity
and for me,
the hilarity of it
but sometimes,
just sometimes,
i get that inkling for country living.
the abundance of space
the friendliness
and the farmland for berry picking.
come the warmer months
you’ll likely find us
hands in the dirt
picking some gem or another
it’s just like heaven.
i like to think this dessert
has the perfect balance
of fancy urban life
and laid back country charm.

Blueberry Clafoutis

it’s quiet around here
that’s how summer is,
you know?
hope yours has been just a lovely.

Blueberry Clafoutis

blueberry clafoutis
note: to make this gluten free, use whatever gf flour you like to use, like almond flour. local milk made a gorgeous one recently.

1 ¼ cups coconut milk, i use SO Delicious
6 TBL sugar
6 eggs
¾ cup spelt flour
3 cups ​blueberries
​zest of lemon & juice of half lemon​
icing sugar, for dusting

preheat oven to 425°.

grease a 9″ baking dish/pie pan. set aside, forget about it.

in a vitamix or blender, add the coconut milk, eggs, salt & lemon juice. blend until combined, add in the flour and blend until smooth.

pour into prepared pan, then distribute the blueberries evenly throughout. sprinkle with the zest.

bake 30 – 40 minutes, though check on it at the 30 minute mark. depending on how deep your dish is, the middle might still be liquidy. you want the finished product to be nicely browned on top and have some jiggle in the middle. mine puffed up a smidge while in the oven but sank as it cooled.

to serve, sprinkle with icing sugar.

best at room temp, and i prefer it the next day. it reminds me of a denser flan.

BAM!

Blueberry Clafoutis

3 veggie dumplings in spicy sauce

3 veg dumplings

inexplicably
i’ve been stressed lately,
last week i spent an
inordinate amount of time
fretting over the overabundance of greens
we picked up from our csa.
we went all in this summer,
doing a full family share,
with the thought process of
hitting the stores less,
eating salads more,
thereby providing us with more time
to do other things,
like
fret apparently.
by mid week,
with just barely a dent in
our stash of foliage,
i was decidedly despairing
over the potential of verdant decay
in the fridge
before the next csa day.

my discontent has merged
in other areas —
i’ve discovered white strands,
slyly mixed in with the ink
black of my hair,
making it stark in contrast.
i’m so vain i know.
then,
like any other person who goes
through the comparison game
i almost damn near shut this space down.
i’m so dramatical i know.
so what to do?
what do i generally do when i need
some perspective?
i take a break,
i simplify,
i purge.
and that’s exactly what i did.
my rss feed,
purposefully limited,
was trimmed further,
as was the twitter & ig space.
it’s nice to not carry around all
that clutter.
as pushed over the ledge
by this read,
from my fave ballerina baker.

this dish is simple:
3 main ingredient filling,
comprised of summer freshness,
it’s light in bulk
so you won’t be left feeling
like donkey ass.

3 veg dumplings

3 veg dumplings in spicy sauce
inspired by olives for dinner
makes 22 dumplings/gyozas

1 1/4 cup fresh peas, i don’t like frozen but it’ll do if that’s what you’ve got
garlic scape, amount up to you, i used just one coil & it was plenty fine
handful greens, i used dinosaur kale, though chard, arugula, spinach are fine
1 tsp sesame oil
1/8 cup (more or less) chickpea flour (any flour would do, i just happened to grab this)
salt/pepper to taste
dumpling/wonton wrappers (the kind i had on hand were made of wheat flour, but if you’re able to find rice flours ones, then this dish would be entirely gluten free)

sauce
1 TBL light soy sauce
1 tbTBL dark soy sauce
1 3/4 cup​ ​hot homemade stock
2 TBL chili oil
1 tsp sesame oil
2 tsp sugar

in a food processor whiz up the garlic scape and greens, you want it to be fine and almost mushy. next, whizz the peas, you don’t want it mushy, you want it to be kinda chunk, there may even be some whole peas. transfer mixture into bowl. add in the sesame oil and salt/pepper. if the mixture is wet, add in the flour, you don’t want it super dry, but you don’t want it wet that it will soak the wrappers. use your best judgement.

add about a teaspoon dollop per sheet, and shape however you want, just ensure that it is fully sealed.

you can either steam them, boil them or fry them up. i went the fried and then steamed route.

heat up a pan with a bit of sesame oil. put the gyoza in a fan-like pattern in the pan, fry them, covered, until the bottoms are nice and crispy. pour in 1/4 cup of water and cover, being careful of splatters. steam for about 5 minutes and remove lid, making sure all the water has evaporated.

for the sauce/soup, heat all the ingredients in a sauce pan. you can either dip the dumplings in the thinned out sauce, or you can just pour the soup/sauce over the dumplings.

BAM!

3 veg dumplings in spicy sauce

my other dumpling/gyoza concoctions:
tofu gyoza
soup dumplings

intense strawberry coconut ice cream & almond waffle bowls

Strawberry Ice Cream + Almond Waffle Cones/Bowls

friends,
i’ve been crazy about
strawberries
we went an entire week,
ok technically only 5 days
of banana-strawberry smoothies:
that splash of almond milk
maybe a handful of baby kale if i think of it
and because i like it freezing cold
and a little icy
and a little thick
maybe a handful
(or two)
of ice cubes
all blitzed in the vitamix
we inhaled the strawberry pavlovas
(and i’m still thinking about them)
(so much so that might have to make them again very soon)
we’re also gonna
have to make another trek to
the strawberry patch
cus we’ve consumed the 14+ pounds
we picked two weekends ago
all this to say
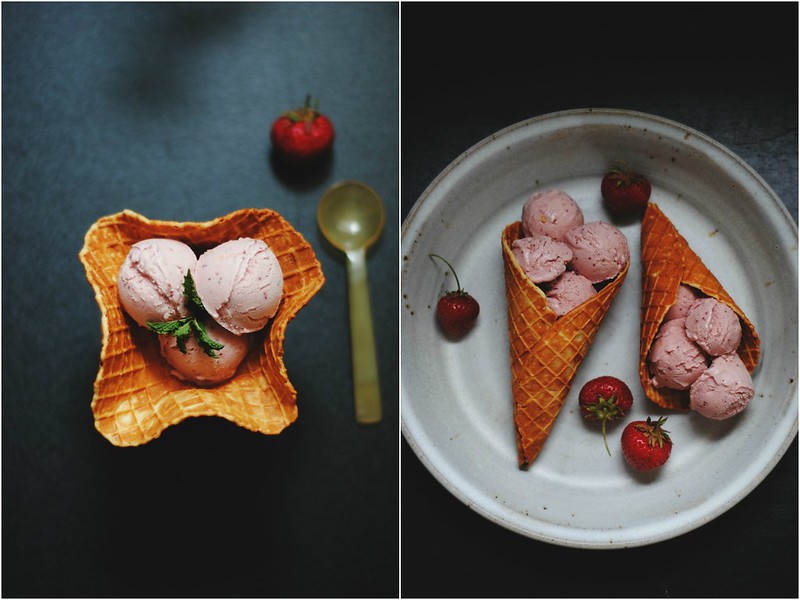
that we made strawberry ice cream
which is kind of pedestrian
to share on a food blog,
i know
it’s straight forward
simple
with a plain egg custard base
mais, alors
the pink hue
the tartness
in fact,
the intense tartness
that can only be described for
the first picks of the season
all encapsulated in this frozen treat
and because it’s such
a basic flavor
i made waffle cones & bowls
not so pedestrian of a post after all!

Strawberry Ice Cream + Almond Waffle Cones/Bowls

intense strawberry coconut ice cream & almond waffle bowls or cones

this recipe uses the yolks i used for the pavlovas. it pays to have a plan sometimes. additional notes at end of recipe.

6 egg yolks
3 cans of coconut milk
1/2 cup sugar
1 TBL potato starch
2 cups of strawberries, washed & quartered or halved
zest of 6 lemons, divided (the lemons were used to make this simple syrup)

for the strawberries, vitamix them until smooth as possible. it’ll equal out to about 1 1/2 cups liquid. reduce down in small saucepan on low heat, throwing a few healthy sprinkles of lemon zest. you’re aiming to get as much liquid/moisture out of the mixture as possible, leaving behind a thick sauce. i reduced it down to about 1/2 cup – 3/4 cup — basically until i got tired of babysitting it.

for the ice cream base, it’s my usual egg custard base. in a medium saucepan add in 2 1/2 cans of coconut milk, reserving the remaining for later. heat up the milk with the sugar until fully incorporated. add in a few healthy sprinkles of lemon zest. in a small bowl, separate your eggs. whisk the yolks, and then with a ladle pour in the hot coconut milk all the while whisking the yolks. this is tempering the yolks so it doesn’t scramble. if you want, add in another ladle-full. then slowly add in the warmed through yolk mixture into the saucepan, still whisking. you want the mixture to be fully incorporated. keep the heat on medium and keeping mixing until the mixture has thickened, about 10-15 minutes. at this point, with the remaining half can of coconut milk stir in the potato starch, then add mixture to the custard. this will thicken the custard even more, while also preventing full on ice crystals from forming when the ice cream is in the freezer.

remove custard from saucepan and allow cool. cover and refrigerate for a few hours, ideally overnight. same thing with the strawberry sauce.

when ready, pour custard base into ice maker and churn, then add in the strawberry sauce. churn according to manufacturer’s specs.

*note – technically, you could mix the strawberry sauce and custard before adding to the machine but it seemed like a whole lot of mixing and we figured the machine was well capable of doing that step for us. we opted to pour the custard first because there’s a lot more of it than the sauce, and there’s always a thin layer of ice cream along the edge of the canister that is difficult to scrape out when frozen. we figured we could “waste” that layer of mainly custard rather than of the strawberry sauce.

Strawberry Ice Cream + Almond Waffle Cones/Bowls

almond waffle bowls or cones
this round made about 4 bowls and two good-sized cones. best to consume day of, but if not, store in very air tight and dry container.

i bought our waffle cone maker TWO SUMMERS ago and we used it ONCE. oh for shame. my beloved adores ice cream and this is one contraption we cannot allow to gather dust!

2/3 cup almond flour
1/4 tsp salt
2 eggs
2 TBL honey
2 TBL coconut oil, melted

in a vitamix, blitz everything until smooth

heat your waffle cone maker to #3. pour batter into it, aim for 1/4 cup (let’s be smart, eyeball it and try not to get greedy) and cook for about 2-3 minutes. check on it after 1 minute, aim for a nice golden brown shade. very quickly and carefully peel the waffle out with a small spatula and shape over a bowl or cup, or into a cone. allow to cool.

a trick: i added a few chocolate chips in the bottom of the cone, the residual warm of the cooking melted it a bit and it created a stopper. if you’re a slow ice cream eater, like dw, hopefully no leaks!

serve with ice cream

BAM!

Strawberry Ice Cream + Almond Waffle Cones/Bowls

other cold treats:
morestomach — spice coconut pecan
morestomach — coffee chocolate chip
morestomach — peppermint chocolate chip
tutti dolci — blueberry cheesecake ice cream
lark & linen — cookies & cream popsicles